I finally bought Good Smile Company's Fate/Zero 1/8 Saber & Saber Motored Cuirassier for quite a good price and I got her this Wednesday.
 |
| GSC Fate/Zero Saber & Saber Motored Cuirassier |
It's a huge box and I was worried about the ride back home. Luckily, the MRT wasn't jampacked and when I arrived at my station, I had a car waiting for me so I wouldn't have to worry about the box getting trampled in public transportation again.
I only decided to unbox the figure on Thursday night. It took me 20 minutes to do. I'll tell you why later. For now, let's take a look at the rest of the box:
 |
| Top of the box |
 |
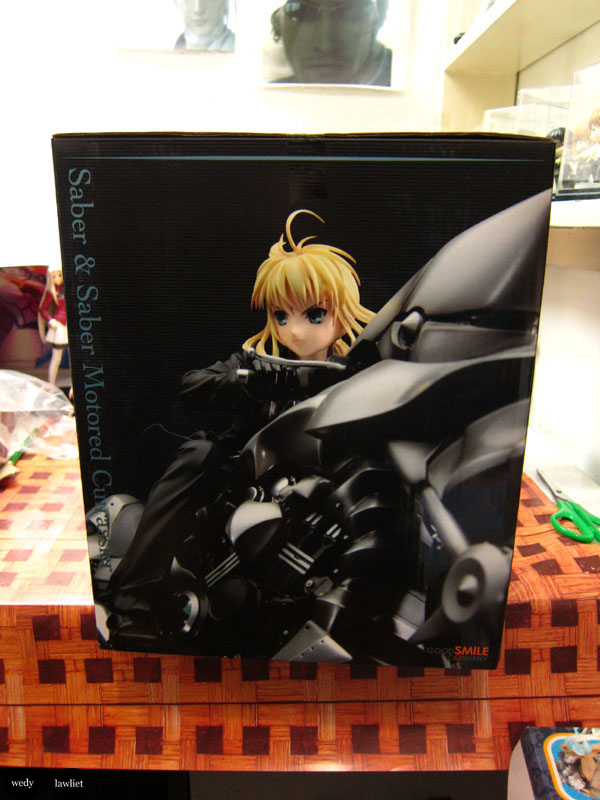
| Side |
 |
| Back |
 |
| Side |
I consider this Saber & Saber Motored Cuirassier to be my "Holy Grail" of Saber figures in my collection. The figure itself is beautifully done, very detailed, and truly majestic to look at, making it a fine centerpiece in every Saber shrine. However, I could say that the box itself is also quite attractive.
Now here's Saber gradually getting out of the box:
And she's out! I was really careful in pulling her out of that box to avoid rattling the parts. Apparently, even if you rattle the plastic enclosures, the parts won't fall out of their place. You'll find out why later.
 |
| Saber's out of the box! |
Check out the inside of the box. You can probably use that as a background if you're going to take pictures. There's also a leaflet printed on glossy paper and it contains instructions on how to properly attach the brakes onto the motorcycle, how to put the motorcycle properly on the stand, how to make Saber hold Excalibur properly, and how to make Saber sit properly on the motorcycle.
 |
| Comes with instructions |
She's too big so I had to transfer her from my usual workplace to the bed and continue the unboxing and assembly there.
There are two protective plastics surrounding her and they're being held together by clear tape on all four sides. There are two clear tapes per side, so you need to cut the tape or peel them off before removing the top protective plastic. After cutting the tapes in their midsection, I was ready to carefully but easily remove the top protective plastic of the Saber & Saber Motored Cuirassier figure. Unfortunately, that didn't happen. I was wondering what's making it difficult to remove the top plastic, so I checked again. After several minutes of trying, I still failed. Then, I turned over the figure and saw these:


Wires. The protective plastics are being held securely together by two wires. If you've played with Barbie dolls before (or perhaps you've seen how it looks like inside), the doll is being held to the cardboard by wires, too, but they can easily be undone because they're merely twisted and bent downward. However, the wires on the protective package of this Saber & Saber Motored Cuirassier figure have been knotted, twisted, and then tucked, as you can see from the pictures above. I was only able to remove the stand first:
If I didn't care about the figure's value and the packaging, I would have torn the plastic open because I didn't really want to bother with those nasty knotted wires. However, I still decided to use these tools to pry the wires and undo them:
 |
| This is used to pick or clean your nails. |
 |
| An ever-reliable screwdriver lying by my TV. |
I couldn't just undo the knots by hand. Tool #1 is something I used to use for clean or pick dirt from under my nails, and tool #2 is self-explanatory. :p
After carefully using those these tools, the wires have finally come undone:
And I finally got Saber, the motorcycle, Excalibur, and the pedals out.
I tried to attach the pedals on my own and I wasn't that sure how, so I had to get the instructions:
If you can't read Japanese, simply take a look at the pictures, observe carefully, and you'll be fine. :)
The motorcycle was quite easy to put on the stand. There's a hole under the rear tire where the metal peg on the stand needs to go.
Once you successfully make that metal peg go inside the hole, the motorcycle should be able to stand properly even if it's supposed to be leaning. There's a certain angle on how the front tire should be, too, so the vehicle won't topple over. Again, everything you'll ever need to know about propping up the motorcycle and assembling the entire Saber & Saber Motored Cuirassier can be found on that glossy leaflet. I advise following the instructions there if you're not confident that you can do it right without them.
Then there's Excalibur. I actually just inserted the handle into the Saber's hand like how I'd make the figmas and Nendoroids do it, but if you check the instructions, you actually have to remove something at the bottom of the handle before doing that. Otherwise, you might start to panic a little if the handle gets a little stuck and won't get pushed further down. Fortunately, I was able to make Saber hold Excalibur properly without ever removing anything from the bottom of the handle.
And finally, we've come to the point where we need to get Saber on the motorcycle. It is pretty easy. What I did was to make sure that her right hand would be on the motorcycle's handle first before ensuring that the hole at the bottom of her heel can properly accommodate a smaller metal peg on the side of the stand:
Because if I didn't do that, she'd end up looking like this:
And then voila! She's ready:
 |
| Good Smile Company Fate/Zero 1/8 Saber & Saber Motored Cuirassier |


